3DS Max Tutorial - Basic Animation Techniques
Setting Key Frames
The process of animating a simple primitive such as a sphere is given below. You can also choose to go with any other primitive.
Once you are ready with a sphere or any other primitive object for the animation, press the "Auto Key" button in the bottom right-hand corner of the screen. The “Auto Key” button will turn red. While it's red, anything you change will create a keyframe in that state at that frame.
You will also notice a slider at the bottom of the screen telling you which frame you're on. It should be at 0. Drag it to whatever frame you want the sphere to be in its new position by. Let’s say 25 frames.
Now move the sphere.
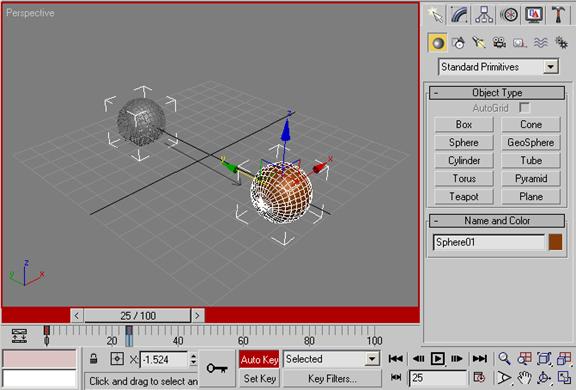
Figure 6-6: Animating a Sphere
Now hit the play button to watch the animated sphere in action.
If you move the sphere again at frame 25, the keyframe will be changed. But if you move to a new frame and move the sphere, a third keyframe will be created with the sphere at its new position. If you turn animate mode off and move the sphere it moves the entire animation.
Time Configuration
Time configuration is used to determine the length of your time segment and scale your animation. It is also simple and does not require much time and knowledge to accomplish these tasks.
Right-click anywhere in the time settings area, or click on the time configuration button at the bottom right-hand corner of the screen.
Then a Dialog Window saying Time Configuration will pop up.
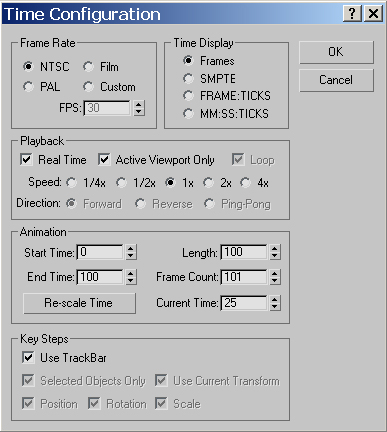
Figure 6-7: Time Configuration Dialog Box
To change the length of the active time segment, either adjust the "end time" or "length" spinners.
To scale the animation contained in the active time segment, click the "Re-scale Time" button in the Animation section of the Time Configuration window.
Another window will appear, in which you select the new length of the animation. This will slow down or speed up the entire animation to fit whichever new time you enter.
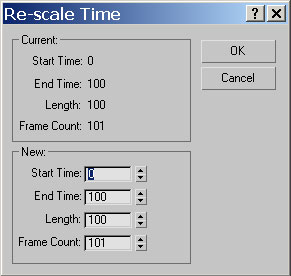
Figure 6-8: Re-scale Time Dialog Box
Track View
With Track View, you can view and edit all the keys that you create. You can also assign animation controllers to interpolate or control all the keys and parameters for the objects in your scene.
Track View uses two different modes, Curve Editor and Dope Sheet.
Curve Editor mode lets you display the animation as function curves. Dope Sheet mode displays the animation as a spreadsheet of keys and ranges. Keys are color-coded for easy identification. Some of the functions in Track View, such as moving and deleting keys, are also available on the track bar near the time slider, which can be expanded to show curves as well. You can dock the Curve Editor and Dope Sheet windows beneath the viewports at the bottom of the interface, or use them as floating windows.
Curve Editor mode lets you display the animation as function curves. Dope Sheet mode displays the animation as a spreadsheet of keys and ranges. Keys are color-coded for easy identification. Some of the functions in Track View, such as moving and deleting keys, are also available on the track bar near the time slider, which can be expanded to show curves as well. You can dock the Curve Editor and Dope Sheet windows beneath the viewports at the bottom of the interface, or use them as floating windows.
Dope Sheet
First, an animation has to be made. In this example the animated sphere used above, will be used. You can do that by following the steps above. Then from the Menus, select “Graph Editors>Track view-Dope Sheet”. This opens the Track View window.
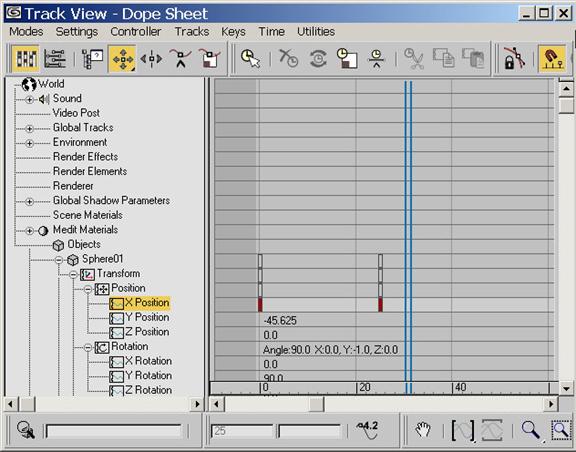
Figure 6-9: Track view-Dope Sheet
The sphere is an object, so click on the + sign next to Objects to open the list of objects. Open the object whose keyframes you want to edit. In this case we are editing Sphere01.
Then open up its transform track, since you're editing its change in Position, which is a transform. Now you should see the keyframes for your object. If you don't, press zoom extents (it is in the bottom left-hand corner of the track view window), and that will zoom out all the way. (In this case the sphere will have two, since it only goes from one place to another during this animation)
- To move the keys around, use the move button to select and move them.
- To create new keys that you can later edit, use the "create key" button. You can type in the exact frame you want the key to be placed in the bottom-right field of the window.
- To delete keys, select them and press the delete key on your keyboard or click on the delete button.
Curve Editor
The Track View - Curve Editor is a Track View mode that allows you to work with motion expressed as function curves on a graph. It lets you visualize the interpolation of the motion, and the object transformations that the software creates between the keyframes. You can easily see and control the motion and animation of the objects in the scene using tangent handles on the keys found on the curves.
The Curve Editor interface consists of a menu bar, a toolbar, a Controller window, and a Key window. There is also a time ruler, and navigation and status tools at the bottom of the interface.
The Track View
Curve Editor is a Track View mode that allows you to work with motion expressed as function curves on a graph. It lets you visualize the interpolation of the motion, and the object transformations that the software creates between the keyframes. You can easily see and control the motion and animation of the objects in the scene using tangent handles on the keys found on the curves. The Curve Editor interface consists of a menu bar, a toolbar, a Controller window, and a Key window. There is also a time ruler, and navigation and status tools at the bottom of the interface.
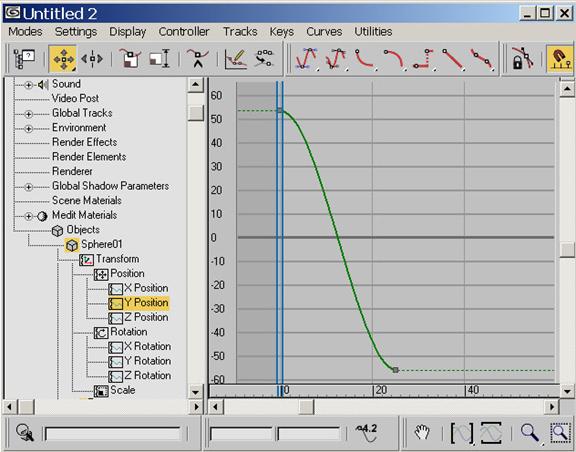
Figure 6-10: Track view-Curve Editor
Select the animated track (like position, rotation, or scale) and press the function curves button. Now the function curve for your animation will open up. If you click on the graph, the keys will become apparent.
- To move the keys, adjust their values, or both, by using the move button.
Motion Panel
The Motion panel provides tools to adjust the motion of the selected object. Key timing and easing in and out of a key are parameters that you can adjust with tools on the Motion panel, for instance. The Motion panel also provides an alternative to Track View for assigning animation controllers.
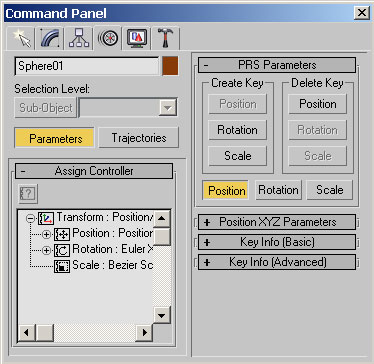
Figure 6-11: Motion Panel
The Parameters button on the Motion panel lets you assign controllers, and create and delete keys too. Controllers are custom key-creating algorithms that can be defined through the Parameters rollout. These controllers are assigned by selecting the position, rotation, or scaling track and clicking on the Assign Controller button to open a list of applicable controllers that you can select.


